AFO 363 – Define serials claims layout
363.1 Introduction
AFO 363 controls the lay-out and the contents for serials claims. The system distinguishes between various types of output files. Per type of output file, you can define an SSP print profile that will then be used to print the claims.
The print profiles that can be defined are linked to three data types:
·
the type of subscription
-
paid subscriptions
-
free subscriptions
-
memberships
·
the rank number for the claim
-
first claim
-
second claim
-
third claim
·
the reason the claim is being sent
-
missing issues
-
stagnant subscriptions
In total, this provides eighteen different profiles, which creates the requisite flexibility for varying the lay-out of the print-out as a function of the various elements.
363.2 Defining serials claims
After you start AFO 363, an overview screen appears with the various claim types and subscription types. You can define an SSP print profile for each combination of claim and subscription type.
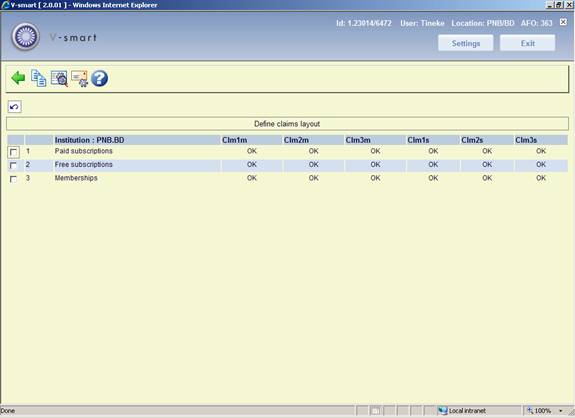
In a normal production situation, the message OK should be in each field meaning that a lay-out is defined for each type of output file and for each type of subscription. If a lay-out has not been defined for specific output file types or subscription types, this can cause malfunctions when printing via AFO 353 (‘Print final claim file').
Options on the screen
: Select this option to create a new profile based on the details of an existing profile.
: Select this option to modify an existing profile.
: Select this option to define email texts.
The options are explained separately in the following paragraphs.
363.3 Copy profile
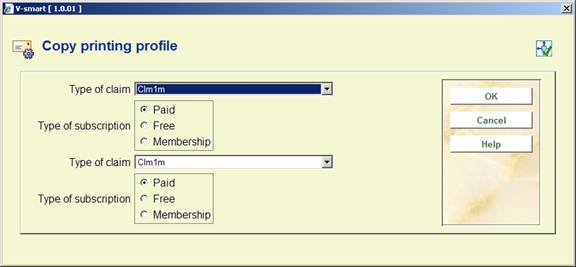
If you have selected the option ‘Copy profile' on the overview screen, an input screen appears:
Fields on the screen
Type of claim: Select the claim type whose profile you wish to copy. Your options are:
|
Clm1m |
Claim 1 for missing issues |
|
Clm1s |
Claim 1 for stagnant subscriptions |
|
Clm2m |
Claim 2 for missing issues |
|
Clm2s |
Claim 2 for stagnant subscriptions |
|
Clm3m |
Claim 3 for missing issues |
|
Clm3s |
Claim 3 for stagnant subscriptions |
Type of subscription: Specify the subscription type profile you wish to copy.
Type of claim: Select the claim type to which you wish to copy the profile.
Type of subscription: Specify the subscription type to which you wish to copy the profile.
Once you have entered the data, the first profile listed will be copied to the last one listed.
363.4 Enter or modify profile
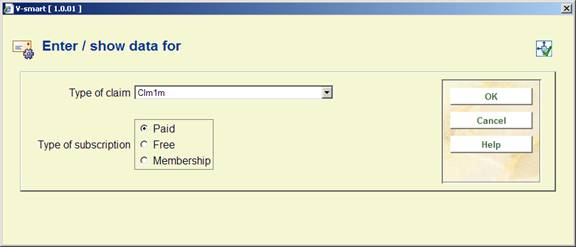
If you have selected the option ‘Enter/modify profile' in the survey screen, an input screen appears:
Fields on the screen
Type of claim: Select the claim type profile you wish to enter or modify.
|
Clm1m |
Claim 1 for missing issues |
|
Clm1s |
Claim 1 for stagnant subscriptions |
|
Clm2m |
Claim 2 for missing issues |
|
Clm2s |
Claim 2 for stagnant subscriptions |
|
Clm3m |
Claim 3 for missing issues |
|
Clm3s |
Claim 3 for stagnant subscriptions |
Type of subscription: Specify the subscription type profile you wish to enter or modify.
After clicking an input form will be displayed:

Print profile type: choose “Blocks” to have the data printed in blocks for each title (claim information will be displayed in blocks containing a line for each element defined) or “Columns”(claim information will be displayed in columns containing the various data elements for all claims).
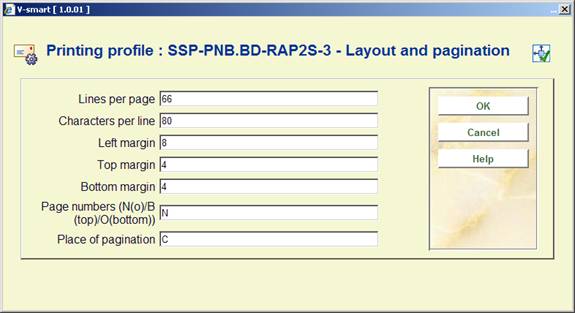
This input form deals with the various setting for the page layout. The options for Place of pagination are: C (center), L (left), or R (right); they have no effect if the previous option (Page numbers) is set to ‘N'.

This input form allows you to define text for top and bottom of the forms in various languages. After choosing a language and clicking the form is presented:

Enter texts as appropriate and repeat this for as many languages as necessary. When you have finished this section click to proceed to the next form:
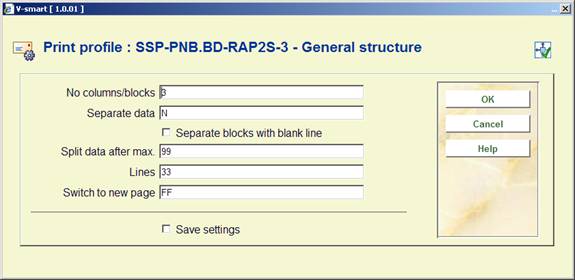
This form deals with the general characteristics of claim notice.
The No columns/blocks option allows you to define the number of columns or blocks (depending on the choice you made on the first screen) containing data such as title, subscription number, issue etc. you want to print on the claim notice.
Next you are prompted with this input form:
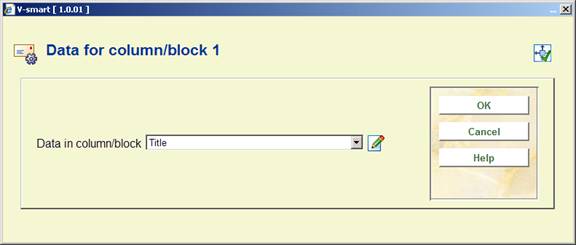
Choose the appropriate data element from the dropdown list and click .
The next input form allows you to define labels (Blocks) or headers (Columns) for the chosen data element in several languages:

After which you are prompted for more parameters regarding the positioning etc. of this data element:

The system will repeat this prompt for the number of blocks/columns you specified in the earlier screen.
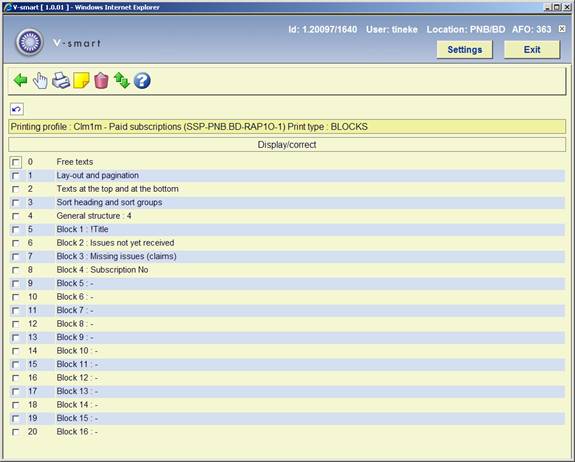
When you have finished the system will display a screen similar to the example below. You must now complete the layout by amending the following sections.
Free texts: when you select this a new menu is displayed:
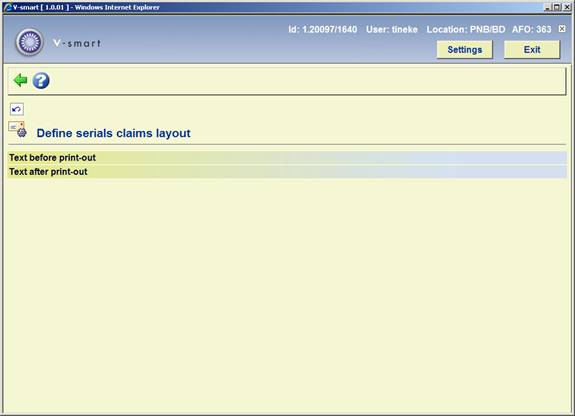
Choose Text before print-out to define the text that will appear at the beginning of a letter. Again you can do this for several languages:

After choosing a language you are presented with an editor window:

Enter texts as appropriate and repeat this for as many languages as necessary. When you have finished this section click to return to the menu. Then repeat this for Text after print-out to define the text that will appear at the bottom of a letter.
Valid codes to be used here are:
· $$DATUM: To add ‘today's' date to a letter.
· $$LEVERANCIER: To add the Supplier name and address to a letter. This will be taken from the definition in AFO 241.
· $$CONTACT: To add the Supplier contact name to a letter. This will be taken from the definition in AFO 241.
Note
Variables must always be the last thing on the line which will be printed If you add text after a variable it will just not appear on the printout.
363.4.1 Overview screen
When you select an already defined type of printout from the overview screen, the system will display a screen as shown in the example below immediately:
Options on this screen
: Select a line and click on this icon to edit the chosen part of the layout.
: The standard form for generating output will be presented. You can print the complete definition of the defined layout.
Note:
This will not print a sample letter based on the layout, just a listing of all the definitions that have been made.
: To add a free text explanation to this layout definition.
: To the delete the whole definition of this layout. You cannot delete lines from the ‘Blocks' (or ‘Columns') definition.
: Select two lines from the ‘Blocks' (or ‘Columns') definition (by using mouse and the CTRL-key) to swop their positions. This can be useful when you have made a mistake, because you cannot delete lines from the ‘Blocks' (or ‘Columns') definition.
Note:
Line 4 (General structure) determines the number of lines (‘Blocks') or (‘Columns') that will actually be printed. So more ‘Blocks' (or ‘Columns') can be defined than are set in this parameter. Make sure you amend this setting when you wish not to print all ‘Blocks' (or ‘Columns'). Again this can come in useful when you have made a mistake: use the option first to move a no longer required data element to the last position. Then decrease the number specified in General structure.
See the previous section for information on the various fields and how to edit them.
363.5 Email texts
With this option you can define Subject and Contents of notices sent via email.
After selecting this option, a form is displayed:

Choose a claim number and a language, after which an input form is displayed:
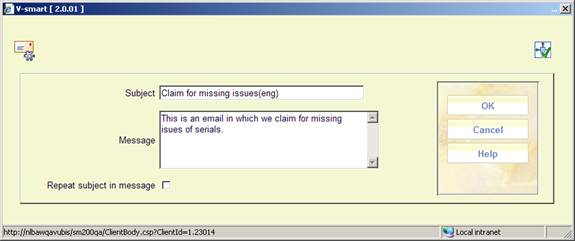
Subject: This text appears in the Subject field of the email.
Message: This text appears at the beginning of the email body followed by the information as defined by your output . Enter the character '|' to indicate new line / line break within the message body.
Repeat subject in message: When the checkbox is on, the text from the subject field will be also included as the first line in the email body.
You can use the same $$ codes as described in section 363.4.